
Template User Guide
1 Setting Up
In Content Manager > Pages, you can create templates and customize the HTML by clicking the edit button on the right side of the entry. You can also upload images and copy their URLs to include in the template. Remember to save the template before previewing it. Objects, such as PIM Products and Customers, can be selected to see exactly what the template will look like when that template is displayed with the object.
For delivery notes and invoices, use Configuration > WMS to set up the appropriate conditions for each specific PDF. For product previews, use Configuration > Product > PIM to set the appropriate templates for listing and detail previews.
2 Custom Strings
The edit page of a template contains an HTML sandbox. Our engine parses standard HTML as well as special strings and tags. The HTML parser replaces special strings with the appropriate product and order information. These special strings have the following structure: __type.code__. The double underscores indicate that it’s a value that needs to be replaced, and the type and codes are columns found in core_attributes. Several special strings that depart from the standard are listed below.
For product preview, current available object will be:
- __products.{attribute code}__
- __sellers.{seller attribute code}__
- __seller_product_price.{price attribute code}__
For email, current available objects will be: (based on trigger event is product or order)
- __products.{attribute code}__
- __fulfilment_orders.{attribute code}__
| String | Description |
| __domain__ | Renders the current of domain. Typically used with image paths. |
| __days__ | Renders the remaining number of days for pickup. |
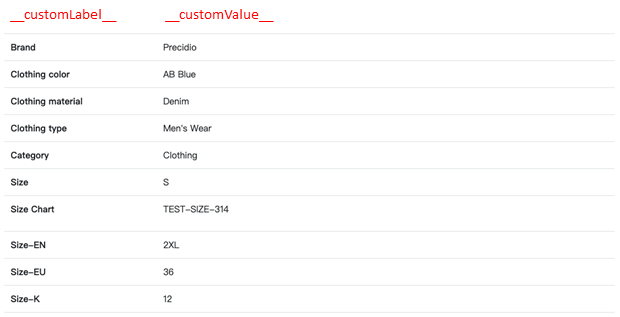
| __customLabel__ | Renders the label of a custom attribute. Must be used in a <customAttributes> tag. |
| __customValue__ | Renders the value of a custom attribute. Must be used in a <customAttributes> tag. |
3 Custom Tags
Custom tags have been implemented to properly render the templates. All tags are double tags, with opening and closing tags.
3.1 Dates
| Tag | Description |
| <date> | Wraps around a date value. Uses a format property that follows Carbon date formatting. Examples: <date format="d/m/Y"> __fulfilment_orders.delivery_date__ </date> <date format="d/m/Y"><today></today></date> |
| <deadline> | Renders the deadline date for pickup. |
| <today> | Renders today’s date in Y-m-d format. |
| <yesterday> | Renders yesterday’s date in Y-m-d format. |
| <tomorrow> | Renders tomorrow’s date in Y-m-d format. |
3.2 Numbers
| Tag | Description |
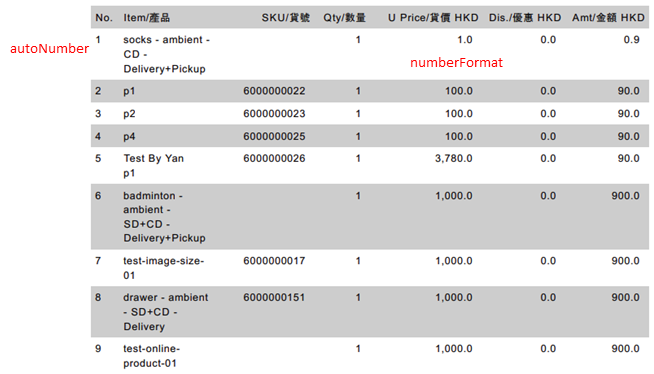
| <auto_number> | Renders an auto-incrementing integer. Typically used for numbering items in a table. |
| <numberFormat> | Formats the number in between by adding commas and decimal places. Contains the following properties: decimals: Specifies the number of decimal places. decimal-separator: Specifies the character used to separate the decimals. Uses "." by default. thousands-separator: Specifies the character used to separate the thousands. Uses "," by default.
Example: <numberFormat decimals=”2” decimal-separator="." thousands-separator=",">1300</numberFormat>. The example above will render 1,300.00. |
| <calc> | Renders a value by evaluating the expression within the tag. Example: <calc>2+5</calc> // will render 7 <calc>__fulfilment_orders.total_amount__ - __fulfilment_orders.discount__</calc> |
3.3 PDFs
| Tag | Description |
| <pdf_style> | Wraps around <style> tags. |
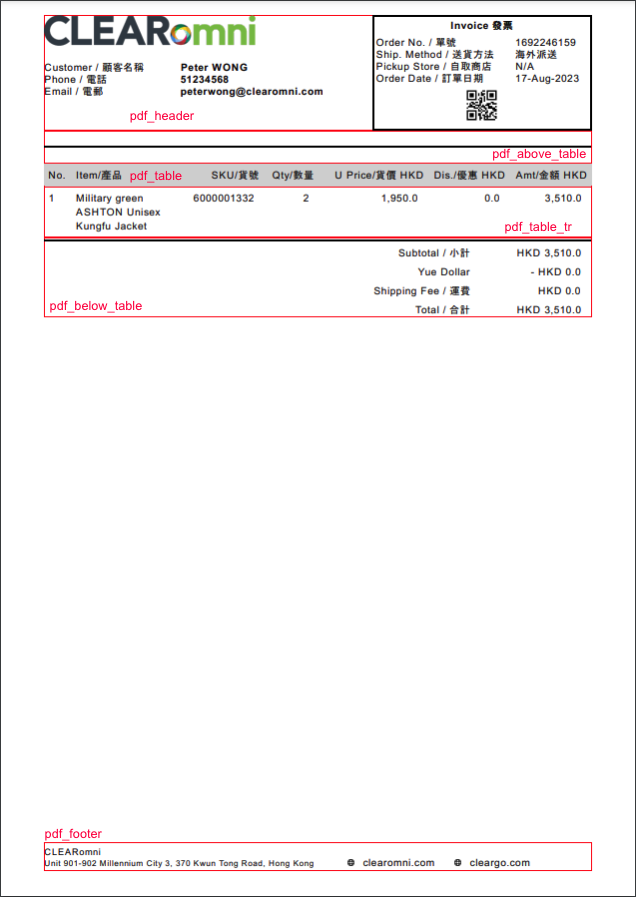
| <pdf_header> | Typically wraps around the logo and information in the top right of the PDF. |
| <pdf_above_table> | Wraps around HTML sticking out above a table. Typically used for additional customer information and total quantities. |
| <pdf_table> | Wraps around <table> tags. Should include table headers. |
| <pdf_table_tr relation="relationName"> | Wraps around <tr> tags. Should not be in <pdf_table>. Only one <pdf_table_tr> is needed per table as the parser will loop over provided objects to render each row. See <loop relation="relationName"> for more details. |
| <pdf_below_table> | Wraps around HTML sticking out below a table. Typically used for subtotals. |
| <pdf_footer> | Wraps around footer HTML. Typically used for business information. |
3.4 Database Tags
These tags are used to retrieve complex data from the database. Data associated with a specific object are organized into different object types and are connected via relationships. For example, an order object has a customer object as they are the one that made the order. These tags are used to get information from objects related to the selected object.
| Tag | Description |
| <relation target="relationName"> | Gets an object specified by the target attribute relationship. An example of this would be using <relation target="saleOrder"> to get the sale order associated with a fulfilment order.
Example with a fulfilment order object: <relation target="saleOrder"> __orders.channel_order_id__ <relation target="customer">__customers.mobile__</relation> </relation> |
| <loop relation="relationName"> | Loops over the objects specified by the relation attribute relationship. Same functionality as <pdf_table_tr> but for non-pdf templates. The relationship should point to an array of objects. Example with a fulfilment order object: <loop relation="items"> <div>__fulfilment_order_items.total_price__</div> <div>__fulfilment_order_items.total_paid__</div> </loop> |
| <customAttributes> | Typically used with PIM products. Fetches custom attributes that are meant to be shown on preview. Uses the HTML inside of <customAttributes> as a template to generate each instance of a custom attribute. An example of a custom attribute would be “Clothing Material”: “Denim.” The text surrounded by double underscores will be replaced with the corresponding data.
Example: <customAttributes> <tr> <td style="width: 25%; font-weight: bold;"> __customLabel__ </td> <td style="width: 75%;"> __customValue__ </td> </tr> </customAttributes> |
| <{attribute code}> | For attributes that have multi values and will not show as custom attributes. Uses the special tag of <{attribute code}> for looping the values. Current support:
Example: <other_images> |
3.5 Printed Data
| Tag | Description |
| <barcode> | Renders a barcode with the text in between. Order numbers and ids can be set here.
Example: <barcode> <relation target="saleOrder"> __orders.channel_order_id__ </relation> </barcode>
|
| <qrCode> | Renders a QR code with the text in between. Order numbers and ids can be set here. To control the styling, wrap the tag in a div with inline styling.
Example: <div style="width:100px;height:100px;vertical-align: middle;margin: auto;"> <qrCode> <relation target="saleOrder"> __orders.channel_order_id__ </relation> </qrCode> </div>
|


3.6 Config Data
| Tag | Description |
| <logo> | Renders the logo specified in Configuration > Design. Attributes can be attached to this tag, such as class and style.
Example: <logo class="logo-img" style="margin: 2px"></logo> |
| <companyName> | Renders the company name specified in Configuration > General. To get the company name in an email subject, use __company_name__ instead. If no company name is specified, this tag will return "CLEARomni Team".
Example: <div> Happy shopping, <companyName></companyName> </div> |
| <siteName> | Renders the site name specified in Configuration > General. To get the site name in an email subject, use __site_name__ instead.
Example in an email subject: __site_name__: You have new products! |